ブログ|オフィス回復ドットコム

オフィシャルブログ

【体験レポ】横浜赤レンガ倉庫「いちごフェス2025 イベント」|スタッフブログ

こんにちは。
オフィス回復ドットコムのスタッフA.Kです。

私たちは東京都豊島区池袋を拠点に、関東一円で内装仕上げ工事や原状回復工事を中心に行っている内装業者です。

今回は少し業務から離れて、休日に訪れたイベント
「Yokohama Strawberry Festival 2025」のレポートをお届けします!
いちご好きにはたまらないイベントの魅力をたっぷりご紹介します🍓


横浜ストロベリーフェス2025の見どころ☝

①いちご尽くしの会場

会場に入ると、いちごの装飾が施された可愛らしい空間が広がっていました。
赤とピンクのデコレーションに彩られたテント内では、多くの人達が
いちごスイーツを楽しんでいて、いちごの甘い香りが広がり、
まるでいちごのテーマパークにいるようでワクワクしました✨

テントの中では、いちご農家さんが厳選した新鮮ないちごを販売していたり、
有名パティシエ監修の特別スイーツも販売していました。

メニューも沢山あって、どれも美味しそうなので選ぶのに迷ってしまいました🤔


いちごフェスの看板🍓

🍓いちごフェスの看板🍓


②限定スイーツが満載!

いちごフェスでは、いちごを使ったさまざまなスイーツが販売されていましたが

特に印象的だったのは、このローズゴールドのいちご型ドリンクボトル!


1.プレミアムいちごミルク専門店 STRAWBERRY HOUSES

『プレミアムStrawberry Houses』苺🍓ボトル

menu

飲み物は全部で4種類✨

・ローズゴールド(右)→いちごみるく
・フューシャピンク(左)→いちごヨーグルト
・クリアピンク(真ん中)
いちごみるく・いちごスカッシュ・いちごサワー

価格:¥1,500(税込)
クリアピンクのみ:¥1,300(税込)

※別途ストラップ(大人用 ¥200(税込)/子供用¥150(税込) )


#strawberryhouses

#strawberryhouses
🍓プレミアム
特濃いちごミルク/ヨーグルト🍓


見た目がとても可愛らしく、いちごのチャームも付いていて
別途で販売している首から下げるストラップ※を購入すれば、両手が空きます。
空のボトルでも持っているだけで可愛くて気分が上がります。
そして、何と言っても!!!!インスタ映え間違いなし!おすすめです😁
私もインスタ用で写真撮っちゃいました📸


友人と自分のボトル写真

🍓友人と自分のボトル写真🍓


※ただしストラップで首に下げると横揺れ、斜めになった時にこぼれる可能性があるので、
対策として最初に少し飲んでから首に下げたほうが安全です☝️
→私はストラップの根元あたりから少しこぼれてしまいました…😅


2.Strawberry Chocolate House

menu

・いちご串
・いちご団子串
・カラフルいちご団子串
・チョコがけゴロゴロいちご

価格:¥700~¥1,800(税込)


チョコがけゴロゴロいちご

🍓チョコがけゴロゴロいちご🍓


私は下調べの段階で『チョコがけゴロゴロいちご』は絶対に食べようと決めていて
一番のお目当てだったので、食べられて幸せでした😍
いちごにチョコがかかっているというシンプルな商品ですが、
思った通り【いちご×チョコ】の組み合わせが甘酸っぱくて絶品でした😋


🍓実際食べたチョコがけゴロゴロいちご🍓

🍓実際食べたチョコがけゴロゴロいちご🍓


※食べるまでの過程

食べるまでに時間が空いてしまうと
上にかかっているチョコレートソースが固まって
食べる時に串でいちごを刺してもチョコがカップに貼り付いてしまい、
串が折れそうでヒヤヒヤしました😂
最後まで食べるのには多少なりとも大変でしたが、味は美味しかったのでよかったです😊


イベントフェスの飲食代はちょっとお高め。でも、事前に食べたいものを決めておけば、
会場内もスムーズに回れていい感じです👍
いちご大福やマカロン、ミルフィーユなど、美味しそうなものがたくさんあって目移りしましたが、
人混みとお財布事情を考えて、友人と「もう満足したし、いっか!」と笑い合いながら会場を後にし、
外の食事スペースでゆっくり味わいながら、フェスの余韻を楽しみました🤭


横浜 strawberry festival 2025 HP

横浜 strawberry festival 2025 HP

横浜 strawberry festival 2025 HP


③巨大いちごのフォトスポットでインスタ映え!

会場の外には、大きないちごのオブジェが設置されていて、多くの人が写真を撮っている中、
私もパシャリ📷しちゃいました。このオブジェはフェスの象徴とも言える存在で、
高さ約2メートルもありインパクトも抜群✊そしてSNS映え間違いなし👍

いちごのオブジェ

🍓いちごのオブジェ🍓


子供も迫力があり驚く半面、興味深々でオブジェを直視していました😊

赤レンガ×巨大いちごのコラボは、どの角度から撮っても絵になるフォトスポットでした。


④いちごフェスを100%楽しむためのコツ

今回いちごフェスに行って楽しんだうえで、より、いちごフェスを満喫するためのポイントをまとめてみました!!


~早めの時間に行く~

– 人気のスイーツによっては、午前中に売り切れてしまうこともあるので、できるだけ早めに行くのがおすすめです。狙った物がある時は是非お早めに!!


~食べ歩きしやすいスイーツを選ぶ~

– いちごフェスならではのメニューは、片手で食べられるものが多いですが、
やはり座って食べたい物だったり、片手では食べられないような物もあるかと思います。
その中で座って食べようと思っても、テーブルが少なく座れないこともあるので
そういった場合は友人などと交互に買いに行ったりと工夫して楽しみましょう🎶


~写真スポットを巡る~

– いちごのオブジェ以外にも、会場内には可愛いフォトスポットもたくさんあるので、
記念撮影を撮りたい方はしっかりチェックしておくと良き映え写真が撮れるかも👀


~お土産も忘れずに!!~

– 限定のいちごスイーツやいちご関連グッズが販売されているので、
自分用にもプレゼント用にもおすすめです。

いちごのフタ付きマグカップ

🍓いちごのフタ付きマグカップ🍓


~まとめ~ 横浜赤レンガで春を満喫🍓


「Yokohama Strawberry Festival 2025」
は、様々ないちごのスイーツやドリンク、フォトスポットなど、
どこを見てもいちご尽くしで、いちご好きの私も友人も子供もとても楽しめました。
友人と子供と一緒に写真を撮ったり、おいしいスイーツを食べたりして、充実した一日となりました。
来年の開催も今から楽しみです🎈
どのような商品が出品されるんでしょうね😃

皆さんもぜひ、横浜赤レンガ倉庫で開催されるいちごフェスに足を運んでみてはいかがでしょうか?🍓

横浜ストロベリーfestivalサイト

👉https://www.yokohama-akarenga.jp/strawberryfes/


当ブログでは、施工現場の様子や工事にまつわる豆知識を発信してまいります。

Instagram・X(旧Twitter)・Facebookでも、最新の現場写真や施工事例を随時公開中です。


ぜひチェック&フォローしてみてください!


\ 池袋エリアの内装工事・住宅リフォームならオフィス回復ドットコムへ /


壁や天井の下地工事から断熱材の施工、クロス仕上げまで一貫して対応可能です。

住宅・店舗・オフィス問わず、施工内容やご予算に応じた柔軟なご提案をいたします。

📞 お問い合わせ:0120-978-226
📍 東京都豊島区池袋2-62-10 武藏屋第3ビル4

Gypsum Board Explained: Key to Supporting Ceilings and Walls in Offices

Hello, and thank you for visiting Office Recovery and Restoration Dot.Com!

Based in Ikebukuro, Toshima Ward, Tokyo, we specialize in interior finishing and original state restoration work for offices and commercial properties across Japan.


In this article, we’ll introduce and explain the construction method of gypsum board, a material widely used in office ceilings and walls.


We’ve covered gypsum board several times in past articles.
However, we realized we haven’t gone into detail about how it’s actually installed.
Since gypsum board is usually hidden behind wallpaper or paint, its installation process isn’t often visible — and therefore not widely known.


We hope this article gives you a better understanding of interior board materials and how they’re used in construction.


Key Features of Gypsum Board


Before we dive into the installation process, let’s take a quick look at the key features that make gypsum board such a popular choice for interior construction.
Among all board materials, gypsum board is the most widely used in both residential and commercial buildings. Its key advantages include:

  • Excellent sound insulation
  • High fire resistance
  • Cost-effective
  • Easy to cut and work with
  • Minimal warping or shrinkage in humid environments


Thanks to these benefits — especially its affordability and fireproof qualities — gypsum board has largely replaced wood-based materials in ceiling and wall construction.


There are also several types of gypsum board available, in addition to the standard version — including boards with enhanced strength, improved fire resistance, and better moisture resistance.
These products also come in a variety of thicknesses, typically ranging from 9.5 mm to 21 mm, depending on their intended use.

One of the most widely used options is the “Tiger Board”, manufactured by Yoshino Gypsum Co., Ltd., which is available in three standard thicknesses: 9.5 mm, 12.5 mm, and 15 mm.


How Gypsum Board is Installed


Because gypsum board is relatively thin, it requires a solid base for installation. There are four main types of base materials:

  1. Wooden framework
  2. LGS (Light Gauge Steel) framework
  3. Concrete surfaces (using GL construction method)
  4. Double-layered gypsum board (applied over existing boards)


1. Wooden Framework


天井に木下地が組まれている様子

Picture of mounting wooden groundwork ceiling in an apartment new construction

While rarely used in offices or retail spaces, wooden framework is still occasionally found in apartments and detached houses.
However, it’s important to note that not all wooden buildings use wooden frameworks.


In fact, some wooden houses may use LGS (light gauge steel) for interior partition walls.
Likewise, wooden frameworks can sometimes be used even in concrete structures when specific design or construction needs arise.

Gypsum boards are attached to wooden frameworks using nails or screws, and the length of the fastener must match the thickness of the board.
Using the wrong size can lead to cracking or reduced structural strength, increasing the risk of poor workmanship or even safety hazards.


2.LGS (Light Gauge Steel) Framework


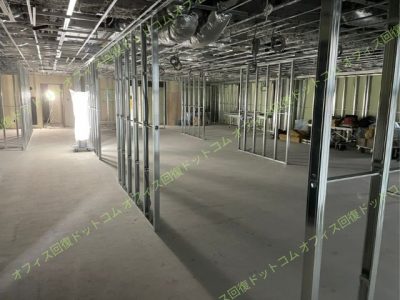
軽量鉄骨下地が天井や壁に組まれている最中

This photo shows the installation phase of LGS framing at a construction site for an educational facility.


LGS frameworks have now become the industry standard in interior construction, surpassing wooden frameworks in both frequency and volume of use.
In fact, in most modern offices, shops, and commercial spaces, LGS is the go-to choice for partition walls and ceilings.

Gypsum board is attached to the LGS structure using self-drilling screws. As with wooden frameworks, the screw length and spacing must be carefully selected based on the board thickness.
If these installation standards are not followed, it can lead to serious issues such as board cracking, insufficient support, or even falling materials, which may result in accidents or costly rework.


3. Concrete surface (GL construction method)


This photo shows the process of applying GL bond using the GL construction method. The colored surface on the concrete is due to sprayed-on thermal insulation.

This photo shows the process of applying GL bond using the GL construction method.
The colored surface on the concrete is due to sprayed-on thermal insulation.


When attaching gypsum board directly to concrete surfaces, screws or nails cannot be used.
In many cases, an LGS framework is first installed to support the board, but when space, budget, or construction time is limited, the GL (Gypsum Lining) construction method is used instead.

In this method, the surface is thoroughly cleaned, and a primer is applied to improve adhesion.
A special adhesive called GL bond is mixed on-site with water, then applied in dabs at regular intervals.
The gypsum board is then pressed onto the adhesive and left to set.

This technique leaves distinct round adhesive marks behind the board, which are often visible during demolition.
Because it relies entirely on adhesive, this method is only suitable for wallsnot ceilings — due to gravity and safety concerns.


4.Double Layer Installation (Over Existing Gypsum Board)


To increase wall strength, a second layer of gypsum board is sometimes installed over an existing one.
In such cases, the board seams are staggered so that the joints of the second layer do not align with those of the first.

Rather than using screws, this method often employs a combination of white construction adhesive and a tacker (a heavy-duty stapler used for temporary fixing).
The tacker holds the board in place until the adhesive dries, which provides the main holding force.

This method is preferred because it improves installation efficiency and reduces labor time.

The amount of adhesive and the number of staples are predetermined.
Skilled installers ensure that the final surface is smooth, with no visible bumps or unevenness.


Gypsum Board Layout Methods


Gypsum boards are generally rectangular, and the way they’re laid out depends on the site conditions and the installer’s preferences.
In most cases, installers try to use full boards as much as possible, cutting only at the edges.
This approach helps reduce labor and material waste.

In standard applications, gypsum boards are later covered with decorative finishes such as wallpaper or paint, so the layout is rarely visible.
However, in cases like decorative ceiling boards (e.g., Gyptone)—often used in schools or hospitals—the visible layout becomes part of the finished design, so the way the boards are assigned and installed is clearly noticeable.

Here are two common layout styles used in decorative ceiling installations.


⓵. Brick Pattern Installation

レンガ貼りで貼られた化粧石膏ボード

This photo shows decorative gypsum boards being installed on the ceiling of a hospital.
The joints are arranged in an alternating pattern, known as the brick pattern.

This photo shows decorative gypsum boards being installed on the ceiling of a hospital.
The boards are laid out using the brick pattern, where the joints are staggered in an alternating fashion.

As the name suggests, each board is offset by half the length of the long side, creating a layout similar to traditional brickwork.

This method is also known as staggered layout, running bond, or horse pattern.


⓶.Straight Joint Pattern


芋目地で貼られた天井化粧石膏ボード

This photo shows decorative gypsum boards being installed in a straight joint pattern at another construction site.


In contrast to the brick pattern, the straight joint layout aligns the board seams in a continuous vertical and horizontal grid.

This method is often used when working with square or uniformly sized boards, especially in layouts where cuts are minimized and a clean, symmetrical appearance is preferred.


Summary


final

final


We’ve just introduced how gypsum board is installed — a material that supports most office ceilings and walls today.

  • Gypsum board has become the standard in modern interiors, replacing traditional materials like plywood and solid wood.

  • It is typically fixed using screws or nails to match the base structure, such as light gauge steel (LGS) or wooden framework.

  • Since the surface is usually finished with wallpaper or paint, it’s important to install gypsum boards quickly and precisely to avoid unevenness.

While gypsum board is usually hidden under finishing materials, except for decorative panels, it is widely used across most ceilings and walls in today’s office interiors.

As the moving season approaches, we often receive inquiries about reapplying or replacing gypsum board after tenants move out.
If you’re planning interior work or considering a restoration project, we recommend reaching out early to ensure smooth scheduling.

Even if it’s not a request for a quote, we’re happy to answer your questions—no matter how small.
Feel free to contact us anytime!


※Kindly note that we provide construction services exclusively in Japan.


-=-=-=-=-=-=–=-=-=-=-=-=-=-=-=-=-=-=-=-=-=-=-=-=-=-=-=-=-=-=-=-=-=-=-=-=-=-=-=-=-=-=-


If you’re considering interior construction work such as ceiling and wall repairs, restoration for offices or shops, or the installation and removal of partition walls, feel free to contact Office Recovery and Restoration Dot.Com.

We also handle projects related to office relocation, move-in/out support, and full-scale renovations.

From initial consultation and quotation to final construction, our team handles everything in-house, ensuring cost efficiency, high quality, and reliable service.
You’re welcome to compare our estimates with others—we are confident in both our pricing and workmanship.

If you have questions like:
How will this be done?” or “What’s a reasonable price for this kind of work?
—feel free to ask us anytime. We’re happy to help.

We also invite you to follow us on Instagram, Twitter, and Facebook for updates and photos from recent projects.
Look for the three colorful icons at the bottom of the page!

📍 Please note: Our construction services are available only within Japan.


~~~~~~~~~~~~~~~~~~~IKEBUKURO~~~~~~~~~~~~~~~~~~~~~

★ For high-quality interior construction and reliable restoration work in Tokyo,
trust Office Recovery and Restoration Dot.Com
— your trusted partner from planning to completion. ★

〒171-0014

Address: 4th floor, Musashiya No.3 Building, 62-10, 2-chome, Ikebukuro,
Toshima ward, Tokyo

Free phone: 0120-978-226

~~~~~~~~~~~~~INTERIOR DECORATIVE WORK CONTRACTOR~~~~~~~~~~~~~

This topic is also explained in detail in our Japanese-language blog.

オフィスの天井・壁のほとんどを支える石膏ボードの施工方法をご紹介

LGSと木下地の違いとは?|内装工事で選ばれる理由と用途の違いを解説!

こんにちは、オフィス回復ドットコムです。

東京都豊島区池袋にオフィスを構え、全国でオフィスの内装仕上げ工事・原状回復工事を
施工している内装業者でございます。

オフィスの内装についてなら何でもお気軽にご相談ください。


内装工事を検討していると、「LGS(軽量鉄骨)」と「木下地」、どちらを選べばいいのか悩むことはありませんか?
結論から言えば、LGSはスピード・精度重視の商業施設向け、木下地は柔軟性や調整力が必要な空間向けに使われることが多いです。

本記事では、それぞれの特徴や使い分けについて、施工会社の目線からわかりやすく解説します。


LGS(軽量鉄骨)とは?


LGSとは「Light Gauge Steel(ライトゲージスチール)」の略で、薄くて軽い鉄製の下地材を指します。
主に内装工事において、壁や天井の骨組みをつくるために使用され、
オフィスビルや商業施設、テナント工事などで非常によく使われる下地材です。

使用される素材は、錆びにくい亜鉛メッキ加工された鋼板(鉄)で、
JIS規格などにより寸法が統一されているため、現場でも安定した精度とスピードで施工が可能
です。


江東区:福祉施設LGS工事

江東区:福祉施設LGS工事

LGSの主な特徴

  • 軽量で扱いやすい:鉄製とはいえ板厚が薄いため、持ち運びや施工がしやすい
  • 施工が早い:工場で製品化された規格材なので、現場での加工が少なくて済む
  • 不燃材料である:火に強く、耐火区画などの仕様にも対応
  • 環境にもやさしい:余材が少なく、リサイクル性も高い


最近では、施工スピードや品質の安定性が求められる内装工事ではほぼ標準採用されており、
特に「天井の高さが高い現場」「大規模な間仕切り工事」「原状回復工事」などでは欠かせない存在となっています。

必要に応じて、木下地と併用して使われることもあります。
たとえば、重量物を取り付ける壁の一部だけを木下地にすることで、LGSのスピード性と木の柔軟性の“いいとこ取り”をすることもあります。


LGSの詳細については下記のブログもご覧ください。

軽量鉄骨(下地)、LGSとは


下地とは?


木下地とは、木材を使って壁や天井の骨組みをつくる下地工法です。
古くから住宅建築などで使われており、現在でも一部の内装工事ではLGSと併用されながら活躍しています。

使用する木材には、杉材・ベニヤ板・集成材などがあり、用途や強度に応じて選定されます。
木は切る・貼る・打つといった加工がしやすく、柔軟な対応が可能なことから、現場での“融通が利く素材”として重宝されています。

埼玉県にあるとある住宅工事

埼玉県にあるとある住宅工事


木下地の主な特徴

  • 加工が自由:曲げたり削ったりといった細かな調整がしやすい
  • 取り付け物に強い:ビスや釘が効きやすく、棚や什器の取付に向いている
  • 音が静か:施工中の工具音が金属よりも響きにくく、営業中の現場にも配慮できる
  • コストを抑えやすい:材質によってはLGSよりも安価になる場合も


ただし注意点として、木は可燃性があるため、耐火性能が求められる場所では使用に制限がかかることがあります。
また、湿気や乾燥によって反りや割れが生じる可能性もあるため、施工環境や仕上げ材との相性を考慮することが大切です。

現場では、棚や造作家具を取り付ける部分だけを木下地にし、それ以外はLGSで施工するというハイブリッドな工法がよく用いられています。
「下地は見えない部分」ではありますが、どんな使われ方をする空間かに応じて最適な素材を選ぶことが、長く快適に使える空間づくりの第一歩です。


LGSと木下地の違いを比較表でチェック!


実際の選定時に役立つように、LGS(軽量鉄骨)と木下地の
主な違いを項目別に比較してみました。
特徴を理解することで、工事内容や目的に合った選択がしやすくなります。


比較項目 LGS(軽量鉄骨) 木下地
材料の特徴 錆びにくい亜鉛メッキの薄い鉄板を使用 木材(杉・ベニヤ・集成材など)
耐火性 ◎:不燃材料で火に強い △:可燃性があり、防火性は劣る
重量 軽量で持ち運びや施工しやすい やや重いが、手に馴染みやすく加工しやすい
施工の早さ 規格化されており、スピーディーな施工が可能 現場調整が多いため、時間がかかることも
加工の自由度 ▲:カットや曲げに制限がある ◎:自由にカット・加工できる
工事音 工具使用時に金属音が出やすい 木材のため比較的静か
工期とコスト 工期は短めだが材料費はやや高め 工期は長くなることもあるが材料費は安いことも
向いている用途 オフィス、商業施設、テナント、耐火区画など 住宅、造作家具、什器取付部、曲線対応が必要な箇所


選ぶときのポイント解説


1. 耐火性能を重視するならLGS一択

商業施設やテナントでは、
消防法や建築基準法の基準を満たすために不燃材が求められることが多く、
LGSはその点で非常に優秀です。

天井裏や壁内部に火の回りやすい素材があると、万が一の際の被害が大きくなるため、LGSが基本になります。


2. 自由な形状や造作には木下地が活躍

曲線のある壁、段差のある棚、家具の埋め込みなど、
“一点物”の仕上がりが求められる現場では木が強いです。
LGSは直線的で規格化された材料なので、自由な加工や細かな調整には限界があります


3. 施工のスピードと整った仕上がりならLGS

工期が短い現場や、直線的な空間をスピーディーに仕上げたいときはLGSの方が効率的
特に商業施設の原状回復やレイアウト変更では、LGSでの施工が定番です。


空白

4. 取り付け物の多い壁には木下地を併用するのが現場の定石

たとえば「この壁にモニターを付けたい」「棚を付けたい」という場合、その部分だけ木下地に切り替えることがあります。
LGSにも補強材を入れることはできますが、ビスが直接効く木の方が手早く施工できるからです。

空白

5. コストと工期のバランスも重要

  • LGSは材料費はやや高めだが、施工が早い分、工期を圧縮できて全体コストは抑えられることも。

  • 木下地は材料費は安くても手間がかかり、職人の技術も必要なため、トータルでコストが高くなることもあります。


実は両方使うのが現場では普通


多くの現場では、「基本はLGS、必要なところだけ木下地」というハイブリッド構成が採用されています。
つまり、一方が優れているからすべてをそれで統一する、という考え方はあまり現実的ではないんです。

使い分けの判断は、空間の用途・仕上げ材・取り付け物・工期・コストなど、さまざまな条件を見ながら行われます。


局どちらを選べばいい?施工現場での使い分け


基本的に、オフィスやテナントではLGSが主流です。
壁面に棚や家具を取り付ける必要があったり、こだわった形状が必要なときには木下地を併用するケースもあります。

実際の現場では、LGSで全体を構成し、一部だけ木下地で補強するというハイブリッドもよくあります。

空白

とめ】


LGSと木下地には、それぞれ得意な場面があります。
「コストを抑えたい」「自由な造作がしたい」「施工を早く終えたい」など、目的に応じて最適な下地材を選ぶことが大切です。

内装工事のことでお悩みがあれば、お気軽にご相談ください。
現場に応じた最適なご提案をさせていただきます!


空白

✅ 判断に迷ったら、まずはご相談ください

LGSも木下地も、それぞれ優れた特性がありますが、
ベストな選択肢は「現場の条件 × 使い方 × デザイン」によって変わります。

「こういう空間を作りたいけど、どちらが合っているか分からない」
そんなときは、お気軽にご相談ください。
私たち施工のプロが、現場に合った下地選びをしっかりサポートいたします。


住宅のリフォーム工事についてならこちら記事を参考にして下さい。

【住宅編:1】リフォームとリノベーションの違いについて


原状回復工事についてならこちら記事を参考にして下さい。

原状回復工事とは?賃貸の大切なポイント


~~~~~~~~~~~~~~~~~~~~~~~~~~~~~~~~~~~~~~~~

オフィスビル・テナント(店舗)の原状回復工事、入居工事、移転、撤退、リフォーム工事など

検討中でしたら是非、弊社へお気軽にご連絡下さい。


Instagram     Twitter     Facebook  

SNSからもお問い合わせできます。是非、ご一緒にご覧ください。


当社は、お見積もりから施工完了まで全てを自社で行い

お客様に「少しでも価格を安く、品質が高くて良いもの」の

提供を目指してお手伝いさせていただきます。


◆豊島区池袋の内装工事・原状回復工事ならオフィス回復ドットコムまで◆

〒171-0014

東京都豊島区池袋2-62-10 武藏屋第3ビル4階

TEL:0120-978-226