Hello, and thank you for visiting Office Recovery and Restoration Dot.Com!
Based in Ikebukuro, Toshima Ward, Tokyo, we specialize in interior finishing and original state restoration work for offices and commercial properties across Japan.
In this article, we’ll introduce and explain the construction method of gypsum board, a material widely used in office ceilings and walls.
We’ve covered gypsum board several times in past articles.
However, we realized we haven’t gone into detail about how it’s actually installed.
Since gypsum board is usually hidden behind wallpaper or paint, its installation process isn’t often visible — and therefore not widely known.
We hope this article gives you a better understanding of interior board materials and how they’re used in construction.
Key Features of Gypsum Board
Before we dive into the installation process, let’s take a quick look at the key features that make gypsum board such a popular choice for interior construction.
Among all board materials, gypsum board is the most widely used in both residential and commercial buildings. Its key advantages include:
- Excellent sound insulation
- High fire resistance
- Cost-effective
- Easy to cut and work with
- Minimal warping or shrinkage in humid environments
Thanks to these benefits — especially its affordability and fireproof qualities — gypsum board has largely replaced wood-based materials in ceiling and wall construction.
There are also several types of gypsum board available, in addition to the standard version — including boards with enhanced strength, improved fire resistance, and better moisture resistance.
These products also come in a variety of thicknesses, typically ranging from 9.5 mm to 21 mm, depending on their intended use.
One of the most widely used options is the “Tiger Board”, manufactured by Yoshino Gypsum Co., Ltd., which is available in three standard thicknesses: 9.5 mm, 12.5 mm, and 15 mm.
How Gypsum Board is Installed
Because gypsum board is relatively thin, it requires a solid base for installation. There are four main types of base materials:
- Wooden framework
- LGS (Light Gauge Steel) framework
- Concrete surfaces (using GL construction method)
- Double-layered gypsum board (applied over existing boards)
1. Wooden Framework

Picture of mounting wooden groundwork ceiling in an apartment new construction
While rarely used in offices or retail spaces, wooden framework is still occasionally found in apartments and detached houses.
However, it’s important to note that not all wooden buildings use wooden frameworks.
In fact, some wooden houses may use LGS (light gauge steel) for interior partition walls.
Likewise, wooden frameworks can sometimes be used even in concrete structures when specific design or construction needs arise.
Gypsum boards are attached to wooden frameworks using nails or screws, and the length of the fastener must match the thickness of the board.
Using the wrong size can lead to cracking or reduced structural strength, increasing the risk of poor workmanship or even safety hazards.
2.LGS (Light Gauge Steel) Framework

This photo shows the installation phase of LGS framing at a construction site for an educational facility.
LGS frameworks have now become the industry standard in interior construction, surpassing wooden frameworks in both frequency and volume of use.
In fact, in most modern offices, shops, and commercial spaces, LGS is the go-to choice for partition walls and ceilings.
Gypsum board is attached to the LGS structure using self-drilling screws. As with wooden frameworks, the screw length and spacing must be carefully selected based on the board thickness.
If these installation standards are not followed, it can lead to serious issues such as board cracking, insufficient support, or even falling materials, which may result in accidents or costly rework.
3. Concrete surface (GL construction method)
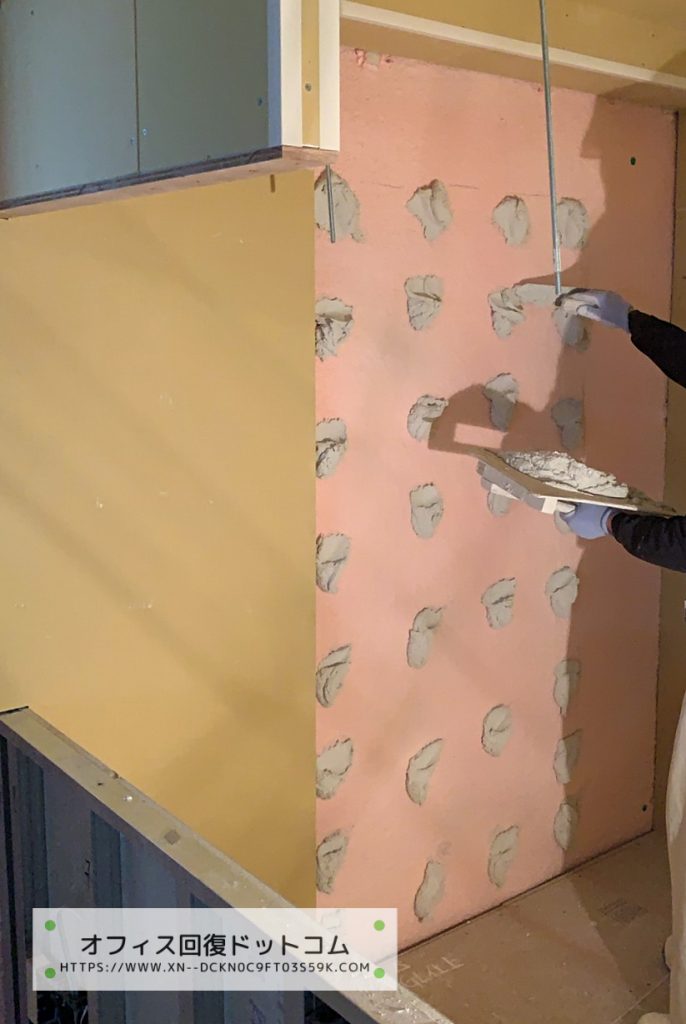
This photo shows the process of applying GL bond using the GL construction method.
The colored surface on the concrete is due to sprayed-on thermal insulation.
When attaching gypsum board directly to concrete surfaces, screws or nails cannot be used.
In many cases, an LGS framework is first installed to support the board, but when space, budget, or construction time is limited, the GL (Gypsum Lining) construction method is used instead.
In this method, the surface is thoroughly cleaned, and a primer is applied to improve adhesion.
A special adhesive called GL bond is mixed on-site with water, then applied in dabs at regular intervals.
The gypsum board is then pressed onto the adhesive and left to set.
This technique leaves distinct round adhesive marks behind the board, which are often visible during demolition.
Because it relies entirely on adhesive, this method is only suitable for walls — not ceilings — due to gravity and safety concerns.
4.Double Layer Installation (Over Existing Gypsum Board)
To increase wall strength, a second layer of gypsum board is sometimes installed over an existing one.
In such cases, the board seams are staggered so that the joints of the second layer do not align with those of the first.
Rather than using screws, this method often employs a combination of white construction adhesive and a tacker (a heavy-duty stapler used for temporary fixing).
The tacker holds the board in place until the adhesive dries, which provides the main holding force.
This method is preferred because it improves installation efficiency and reduces labor time.
The amount of adhesive and the number of staples are predetermined.
Skilled installers ensure that the final surface is smooth, with no visible bumps or unevenness.
Gypsum Board Layout Methods
Gypsum boards are generally rectangular, and the way they’re laid out depends on the site conditions and the installer’s preferences.
In most cases, installers try to use full boards as much as possible, cutting only at the edges.
This approach helps reduce labor and material waste.
In standard applications, gypsum boards are later covered with decorative finishes such as wallpaper or paint, so the layout is rarely visible.
However, in cases like decorative ceiling boards (e.g., Gyptone)—often used in schools or hospitals—the visible layout becomes part of the finished design, so the way the boards are assigned and installed is clearly noticeable.
Here are two common layout styles used in decorative ceiling installations.
⓵. Brick Pattern Installation

This photo shows decorative gypsum boards being installed on the ceiling of a hospital.
The joints are arranged in an alternating pattern, known as the brick pattern.
This photo shows decorative gypsum boards being installed on the ceiling of a hospital.
The boards are laid out using the brick pattern, where the joints are staggered in an alternating fashion.
As the name suggests, each board is offset by half the length of the long side, creating a layout similar to traditional brickwork.
This method is also known as staggered layout, running bond, or horse pattern.
⓶.Straight Joint Pattern

This photo shows decorative gypsum boards being installed in a straight joint pattern at another construction site.
In contrast to the brick pattern, the straight joint layout aligns the board seams in a continuous vertical and horizontal grid.
This method is often used when working with square or uniformly sized boards, especially in layouts where cuts are minimized and a clean, symmetrical appearance is preferred.
Summary

final
We’ve just introduced how gypsum board is installed — a material that supports most office ceilings and walls today.
-
Gypsum board has become the standard in modern interiors, replacing traditional materials like plywood and solid wood.
-
It is typically fixed using screws or nails to match the base structure, such as light gauge steel (LGS) or wooden framework.
-
Since the surface is usually finished with wallpaper or paint, it’s important to install gypsum boards quickly and precisely to avoid unevenness.
While gypsum board is usually hidden under finishing materials, except for decorative panels, it is widely used across most ceilings and walls in today’s office interiors.
As the moving season approaches, we often receive inquiries about reapplying or replacing gypsum board after tenants move out.
If you’re planning interior work or considering a restoration project, we recommend reaching out early to ensure smooth scheduling.
Even if it’s not a request for a quote, we’re happy to answer your questions—no matter how small.
Feel free to contact us anytime!
※Kindly note that we provide construction services exclusively in Japan.
-=-=-=-=-=-=–=-=-=-=-=-=-=-=-=-=-=-=-=-=-=-=-=-=-=-=-=-=-=-=-=-=-=-=-=-=-=-=-=-=-=-=-
If you’re considering interior construction work such as ceiling and wall repairs, restoration for offices or shops, or the installation and removal of partition walls, feel free to contact Office Recovery and Restoration Dot.Com.
We also handle projects related to office relocation, move-in/out support, and full-scale renovations.
From initial consultation and quotation to final construction, our team handles everything in-house, ensuring cost efficiency, high quality, and reliable service.
You’re welcome to compare our estimates with others—we are confident in both our pricing and workmanship.
If you have questions like:
“How will this be done?” or “What’s a reasonable price for this kind of work?”
—feel free to ask us anytime. We’re happy to help.
We also invite you to follow us on Instagram, Twitter, and Facebook for updates and photos from recent projects.
Look for the three colorful icons at the bottom of the page!
📍 Please note: Our construction services are available only within Japan.
~~~~~~~~~~~~~~~~~~~IKEBUKURO~~~~~~~~~~~~~~~~~~~~~
★ For high-quality interior construction and reliable restoration work in Tokyo,
trust Office Recovery and Restoration Dot.Com
— your trusted partner from planning to completion. ★
〒171-0014
Address: 4th floor, Musashiya No.3 Building, 62-10, 2-chome, Ikebukuro,
Toshima ward, Tokyo
Free phone: 0120-978-226
~~~~~~~~~~~~~INTERIOR DECORATIVE WORK CONTRACTOR~~~~~~~~~~~~~
This topic is also explained in detail in our Japanese-language blog.
オフィスの天井・壁のほとんどを支える石膏ボードの施工方法をご紹介